Mobile Application Development: A Full Step-By-Step Guide
Just 20 years ago, it was hard to imagine that all cell phones we knew were going to become smartphones with a lot of features that can greatly hue our life. Those old mobile phones with a bunch of buttons and small screens that were capable only for calling are now in the past. Slim multi-functional devices with large screens replaced cassette players, Internet cafes, TV, computers, radio, and other technologies. A whole world of different opportunities is now available in your hand. According to Pew Research Center, more and more people of different ages become owners of at least one smartphone.

Considering the continuing growth, it is impossible for software development companies to ignore such a niche as custom mobile application development. Therefore, today, we prepared a step-by-step guide of the full-cycle mobile development covering all the details of the process that you should follow.
What Should You Know About Mobile Application Development?
This is the process of creating software for mobile devices usually operating on Android and iOS, as the most popular choices on the market. The platforms are similar, but also require the usage of different SDKs (Software Development Kits). Besides that, you have to know that this process is relevant for absolutely any industry. Construction, real estate, ecommerce, logistics, education, blockchain – both clients and company’s employees need programs that can help them to easily navigate in this or that sphere. And, how can you make it more accessible for users at any place and any time? You are right, by making a mobile app.
Each year more and more technologies and features evolve and occur that can be integrated in this type of apps, including AI (Artificial Intelligence), image recognition, Cloud Computing, gamification, AR (Augmented Reality), and more. Be ready that the development process may become a bit complex if you don’t have specialists with the relevant skills in your team. This is why many organizations often resort to the help of outsourcing companies that offer custom software development services. Besides that, if you have a clear plan, select a platform to use, and know your target audience, it will be much easier to avoid the possible hurdles.
All Steps of Mobile Application Development Process
To successfully follow and finish the full cycle mobile application development process, it is vital to have an idea of which steps your plan should have in order to succeed. Therefore, let’s have a better look at our step-by-step guide of developing a high-quality and robust solution.
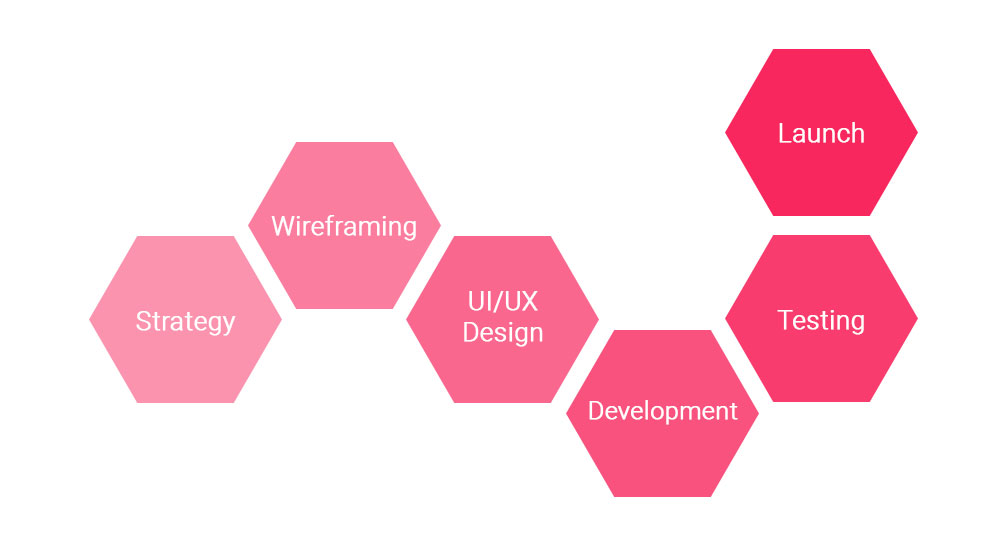
Step 1. Discussing Strategy and Project Requirements
The starting point of the entire process includes several actions from you and your team. It is important to decide together with your team members what kind of app you even want to develop and what the objective is. Your target audience should be heard as well as their interests and requirements have to be met. Your team also has to know or learn certain skills, while certain experts might be hired to help you along the way.
Moreover, you must know company needs, its available resources and how they intervene. If there is a need in developing a CRM system or creating project management software, discuss if your business can afford such a platform. When you have a task to develop a solution that will help your company to get ahead of your competitors by making something unique, it is essential to expect that you will have to invest more. Therefore, defining estimation and exploring business insights is vital at this stage of development. Market research cannot be omitted at this point.
If you work with an outsourcing company, think through the signing of an NDA. Whether to sign it or not is the decision that varies from one company to another, so it’s completely up to you to make a choice. If you want to be sure that the information of your project and your business should be confidential between the parties, so be it.
Step 2. Planning and Wireframing
This is when you start shaping your ideas into something accomplishable and creating a roadmap. Gather a meeting to discuss who is able to take which tasks. During the meeting, group the requirements you want to fulfill for your app into milestones, define your MVP (Minimum Viable Product), and identify the skills of the teammates that will join the project. It is even better to gather several times in order to recharge and be capable of absorbing and analyzing information portion-wise. Choosing the platform or going for cross-platform app development is another factor that has to be discussed. Don’t forget to think of the name for your app as well.
When you begin the wireframing phase, it is vital to decide on the design and functionality of your app. For example, make several prototypes that will have the dimensions of the actual devices you develop. This way, you will be able to avoid possible big changes during the future stages. Wireframing helps massively in understanding the overall scope of work for the entire team and define design sprints. Design sprints are useful, and they include the following steps:
- Understanding the problem;
- Defining the key strategy;
- Creating different solutions;
- Deciding on the best ideas;
- Making prototype;
- Hearing feedback.
In other words, wireframing is a pillar of your application, because it gives you an idea of how the whole system of the app would work and shows the user flow. It showcases how each implemented features will be presented and how, in theory, they can function. Thus, the stakeholders will understand what to expect.
Step 3. UI/UX Design
The next phase is about finalizing the visual representation of the app so that it will suit the company’s needs as well as technologies and frameworks that will be used at later stages. The key goal of the UX/UI design development is to create intuitive user experience and make your app interactive and user-friendly. That is why it is required to define which information and where will be displayed, which data will be collected, and which interactions can be performed. It is also essential to determine the color scheme, fonts, and overall graphics and aesthetics in order to let customers recognize that this app is from your brand for sure.
All in all, going from wireframes to mockups is how you progress to this stage. You can also go straight for the interactive prototype to save time and simulate the user experience. It is a good way to understand how the finished product will look and function.
Step 4. App Development
To proceed with the next step, it is vital to decide on technical architecture, choose a technology stack, and determine the milestones and tasks. After you define these points, you need to break the whole process into three major parts:
Front-end
This is what users will interact with eventually. Make front-end engaging, interactive, and usable for anyone. Front-end development is an important part of the process, and it should have a good mix with the back-end.
Back-end
This is basically the backstage of your application. During the procedure, a developer works with the database and server-side objects that will assist the functionalities of the app.
API
API (Application Programming Interface) is a set of protocols, which is meant to ensure that the interface of your app is scalable and secured. It provides successful integration between data and devices by collaborating front-end with back-end.
If talking about the development approaches, there are several of them that you can go for. You need to be aware of differences, because each option requires certain skills from developers. Let’s take a closer look at each architecture type:
- Native
This is simply the creation of an app on a certain operating system. For example, if you want to write an app for Android devices and don’t want to develop it for other platforms, you can just choose this option and don’t spend your time on exploring other approaches. However, if you think that in the future you may want to have your app on iOS as well, maybe the next option will be a better choice.
- Cross-platform
This type of approach allows you to build one app for several mobile platforms. Some of the programming languages support cross-platforming, which makes it easier to develop. You write in one language and create for different operating systems simultaneously. This approach helps companies to save money and time if they want to push their brands across the platforms.
Read Also Mobile App Development: Constant Dilemma of Choosing Either Native or Cross Platform
- Hybrid
This option is very similar to the cross-platform development approach, however, it combines native app and web app development. It allows developers to use such languages as HTML, CSS, and JavaScript. It simply depends on your goals and which devices your target audience uses.
- PWA
PWAs (Progressive Web Applications) are the web apps that use web-platform features, progressive design approaches, and are functional on native platforms. They usually utilize background scripts, which run in the browser and provide features such as push notifications. PWA is built with simpler codebases, because it requires only web languages rather than platform-specific SDK frameworks.
Besides the development approaches and phases, you need to define a technology stack that you will use depending on your choices at previous stages. All in all, there are many options, so let’s look at the most popular ones.
React Native
This is one of the most used cross-platform frameworks. React Native greatly increases the process offering consistent and fast development experience and enables easy use of a single codebase across several different platforms. You can also use this library with third-party plugins, and it allows you to reuse components.
Flutter

This free and open framework allows you to develop native apps with a simple codebase, which means that it is a cross-platform option as well. Flutter offers you more rapid development and performance that is similar to native. It also has debugging and integrating APIs as well as a good rendering engine.
Read Also Flutter vs React Native. How to Cover All Mobile Platforms in 2022 With No Hassle
Xamarin
Another cross-platform open-source framework that guarantees quicker coding. It allows you to build apps with native behavior for Android, iOS, tvOS, WatchOS, macOS, and Windows in C# and .NET and by using Microsoft Visual Studio. It has Android SDK manager, Google emulator manager, various diagnostic tools, and other useful features.
Ionic
If talking about this cross-platform alternative, it is important to mention that Ionic is also often used for building interactive hybrid apps and PWAs. It utilizes Apache Cordova and Angular to help developers build solid and feature-rich applications. It provides users with consistent interface, simple navigation, and enhanced performance.
Node.js
This JavaScript runtime framework can immensely help you in developing any application, because it is also a cross-platform option. Node.js can handle several concurrent connections together and supports the development of server-side and scalable networking applications. It simplifies web application development by offering a great variety of JavaScript modules.
Step 5. App Testing
After you finish the development phase, the most interesting part is only about to start. Now you need to test your mobile application to check if there are any flaws and errors that require fixing. Software testing and QA is the step you should do next so that you ensure the stability, usability, and security of your app. During the stage, you will have to undergo several milestones by testing the following:
- Overall user experience;
- Functionality of an app;
- Performance and stability;
- Possible security issues;
- Device and platform compatibility.
It is vital for the QA team to review each action a user can perform, ensure that all buttons are clickable, and that all pages can be loaded as intended. This is the phase when if you miss something, it will be fixed with additional costs, time, and effort. And this is not what your team wants. The goal is to check every corner and exclude unintended dead ends.
Read Also Why Software Testing Plays a Key Role in a High-Quality Software Product Development
Step 6. Launch and Post-Production Support
And here you are, at the final boss. Now all that’s left to do is to publish your application and guarantee its support with further updates. You will need a developer account in order to download your application to Google Play Store or App Store. Don’t forget that each update you submit goes through a review process from the platform you chose, which is why you can’t immediately give your customers what they want. Besides publishing and supporting it, you should also check insights and track KPIs (Key Performance Indicators) in order to understand how good or bad your app is going. Also, it will be a huge plus if you promote it. Otherwise, how else will you grow your audience? Now it’s time for other teams in your company to shine.
Conclusions
It may be daunting when you realize how much work has to be done to develop a successful and high-quality app. It is true that your team has a lot ahead, but it is inevitable if you don’t want to be stuck in a vicious cycle of fixing and remaking everything. There is no gain without pain, so you can be sure that your efforts will be rewarded if you plan all the steps and make one at a time during the full cycle mobile app development process. If your team doesn’t have enough relevant skills, you can contact us and get support from experts in creating a unique solution.


